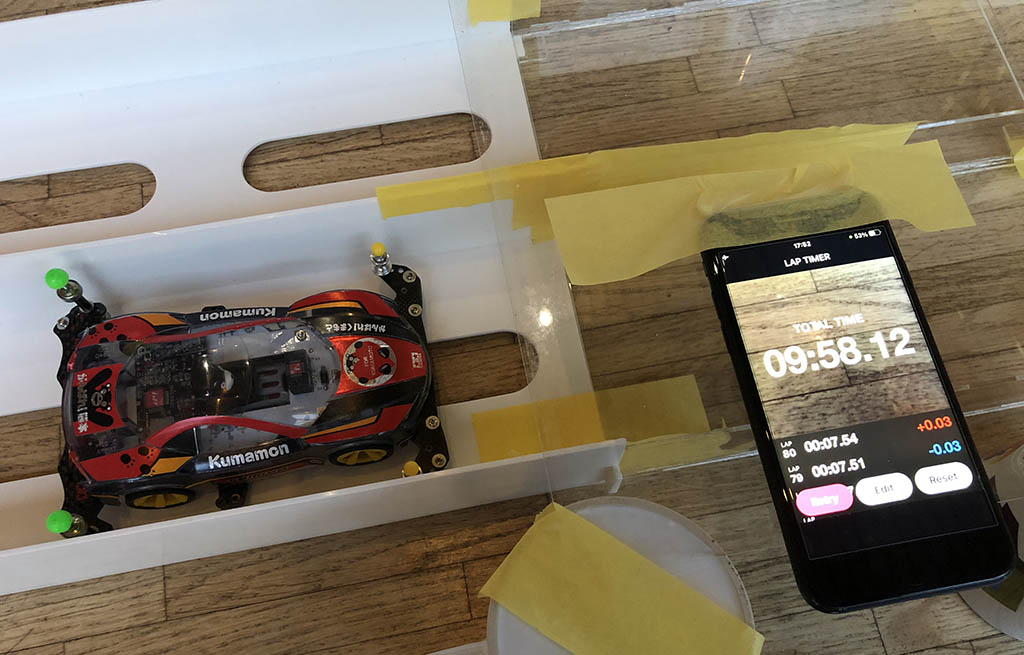
Do you know how to rank the Tamiya Mini 4WD brake sponge pads according to their stopping power? Do you know which one is the strongest? Is hard better than soft? Is red stronger than black? We conducted a scientific experiment to measure the frictional properties of the different brake pads and rank them according to their stopping power.
First published on 30th December 2023. Last updated with white brake pad findings on 29th April 2024.
Background
When racing Mini 4WDs in a technical track with lots of jumps, braking is a very important part of keeping the car from flying off the track. Tamiya makes several different brake sponge pads with different properties (From Green, Blue and Black to Grey, White and Red).
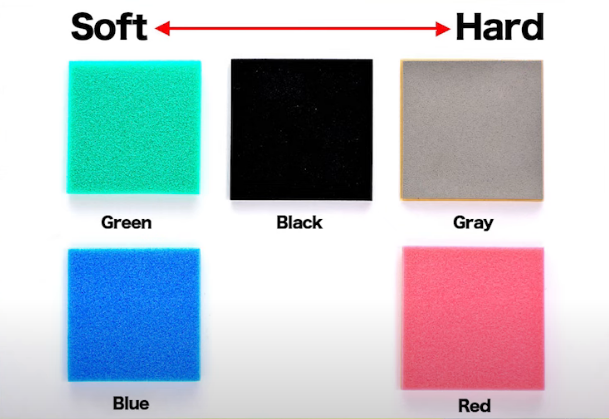
Historically there was very little official information about their braking properties and the only thing we knew from the official Tamiya video was that some pads are softer and some are harder. But what does it mean it terms of how much it can do to slow the car down?
Recently a bit more information can be found on Tamiya’s website when looking up the parts:
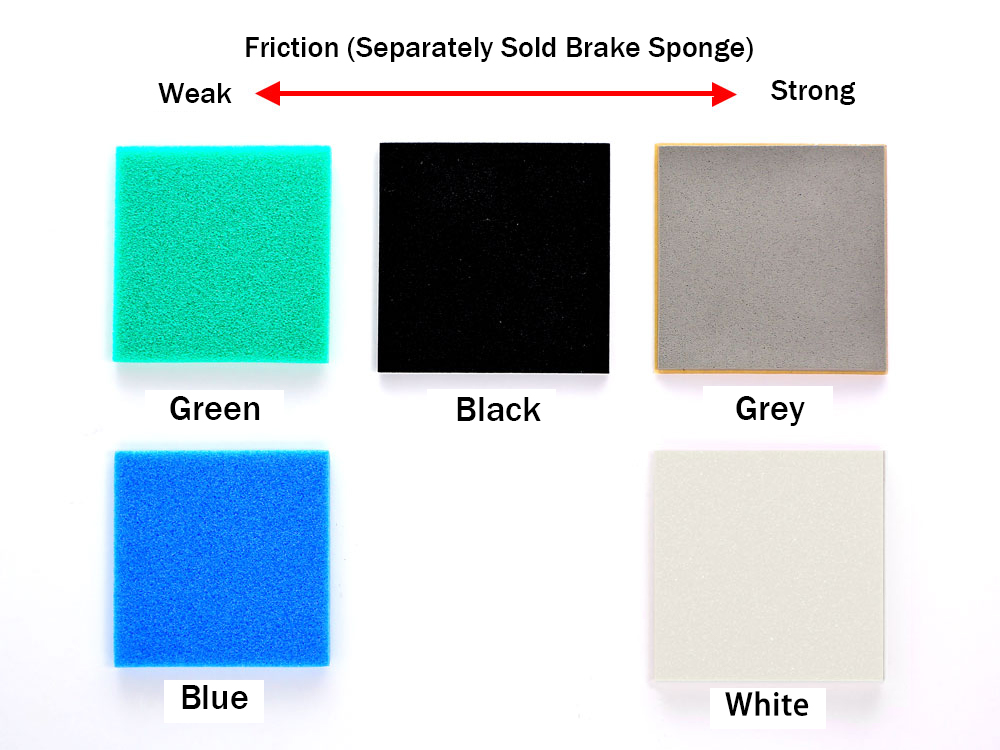
According to Tamiya, blue and green are weak, black is middle and grey and white are strong. But there is no information to tell us how much stronger black is compares with green or blue, or are grey and white the same etc…
The science
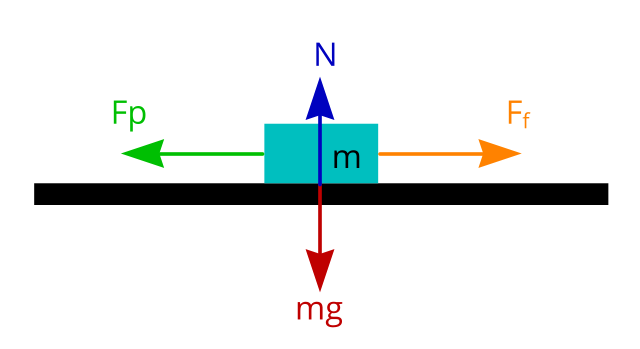
Force is measured in Newtons
m is the mass of the object (in kg)
g is the gravitational acceleration (in metre per second square m/s2). Gravitational acceleration on earth is pretty much constant. We are going to use 9.8 m/s2 in our experiment.
mg is the mass of the object × gravitational acceleration. If an object has a mass of 2kg, then the force acting on the surface through gravity is 2 × 9.8 = 19.6 Newtons
N is the normal force. Since the object is not accelerating downwards through the ground, the ground is exerting the same amount of force (normal force) upwards to keep the object in place, so N is also 19.6 Newtons.
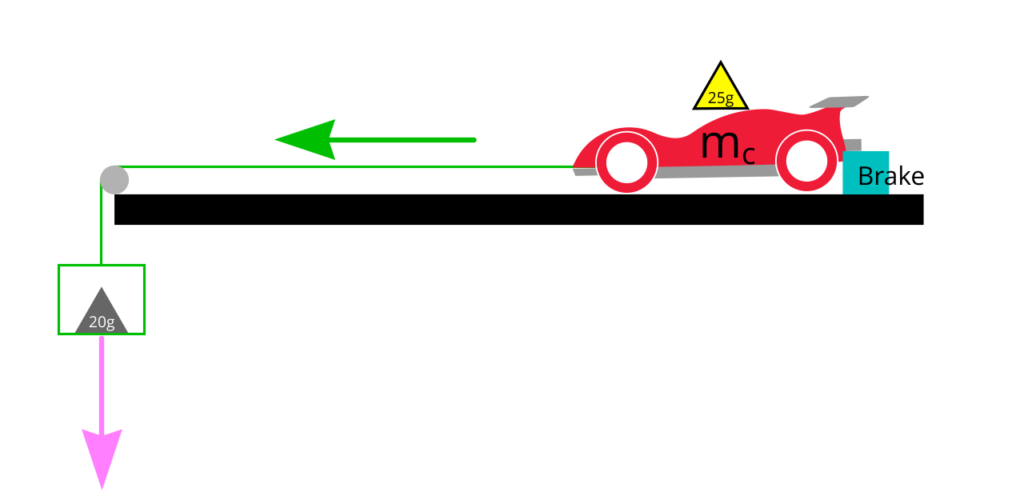
Fp is the force pulling the object to the left. If the pulling force is less than or equal to the frictional force (Fp <= Ff ) the object will not move. But if the pulling force is greater than the frictional force (Fp > Ff), the object will start moving to the left.
Frictional force (Ff) is measured in Newtons.
Frictional force Ff = μ N
Where
μ is the static frictional coefficient (μs) or kinetic frictional coefficient (μk)
N is the normal force (in Newtons).
Static frictional coefficient is measured when the object goes from static (not moving) to moving.
Kinetic frictional coefficient is measured when the object continues to move despite the friction between surfaces but not accelerating or decelerating. E.g. the car keeps sliding at a constant speed.
Therefore:
Frictional coefficient = Frictional force ÷ Normal force ( μ = Ff ÷ N )
Since we can measure m and we know g. We can calculate N as N = mg. If we can steadily increase the amount of pulling force (Fp) until the object starts to move. We can calculate the frictional coefficient. Hence:
Frictional coefficient = Pulling force ÷ mg
Learn more about friction in our Science 101 friction article here.
The setup
We made a test environment that allowed us to measure the frictional properties of the brake pads.
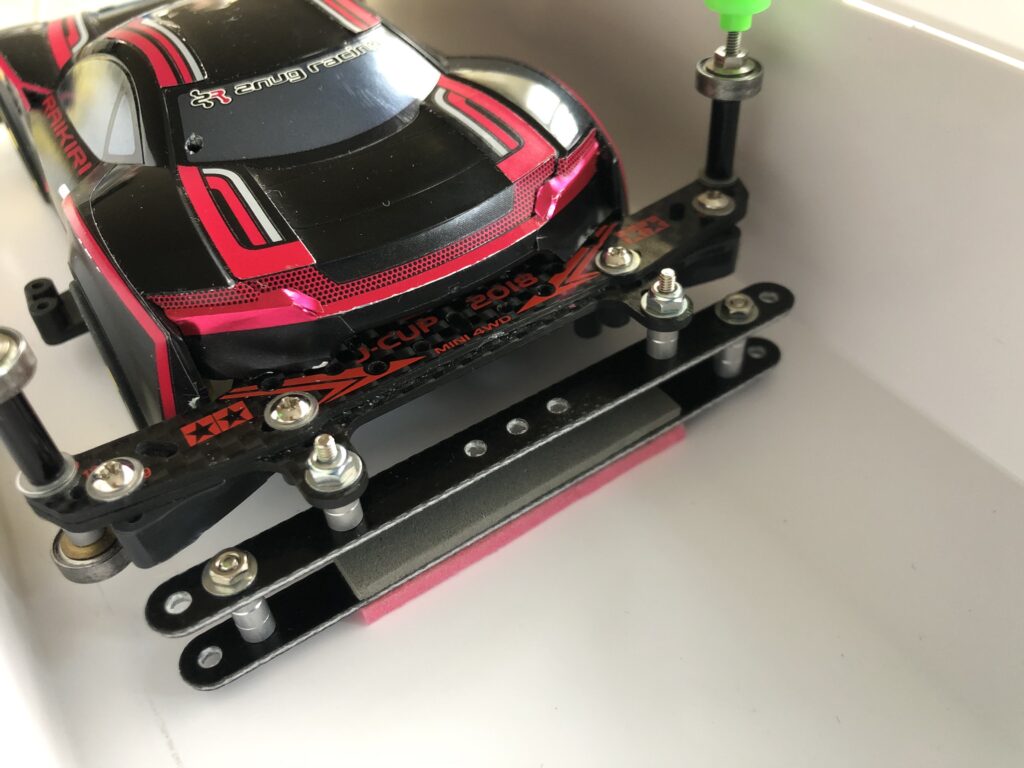
The brake pad will be mounted to the rear stay of our Mini 4WD test car. We removed the gears in the car so that the wheels can move freely with minimum friction. The rear brake mount is made taller so that it lifts the rear wheels off the ground just a little to enable us to measure the brake pads property. The front wheels will be supporting the front of the car.
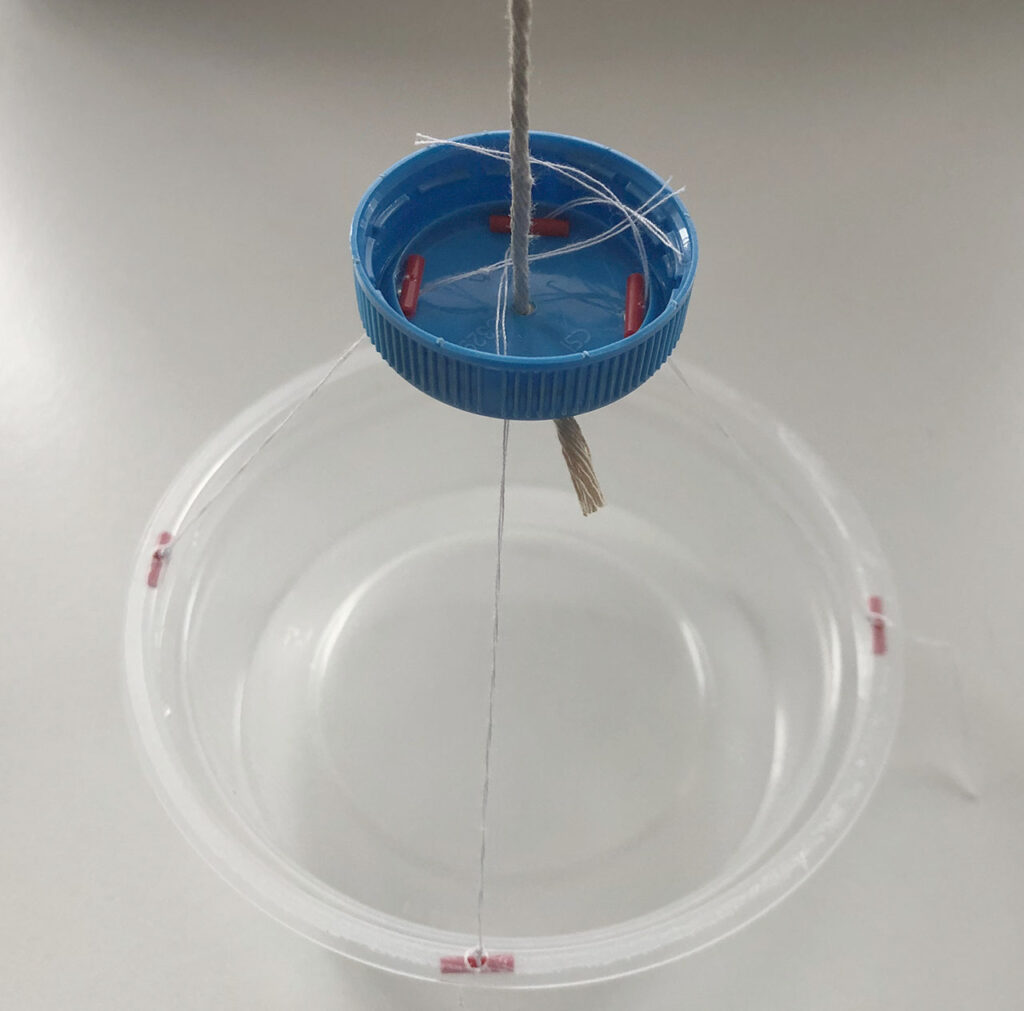
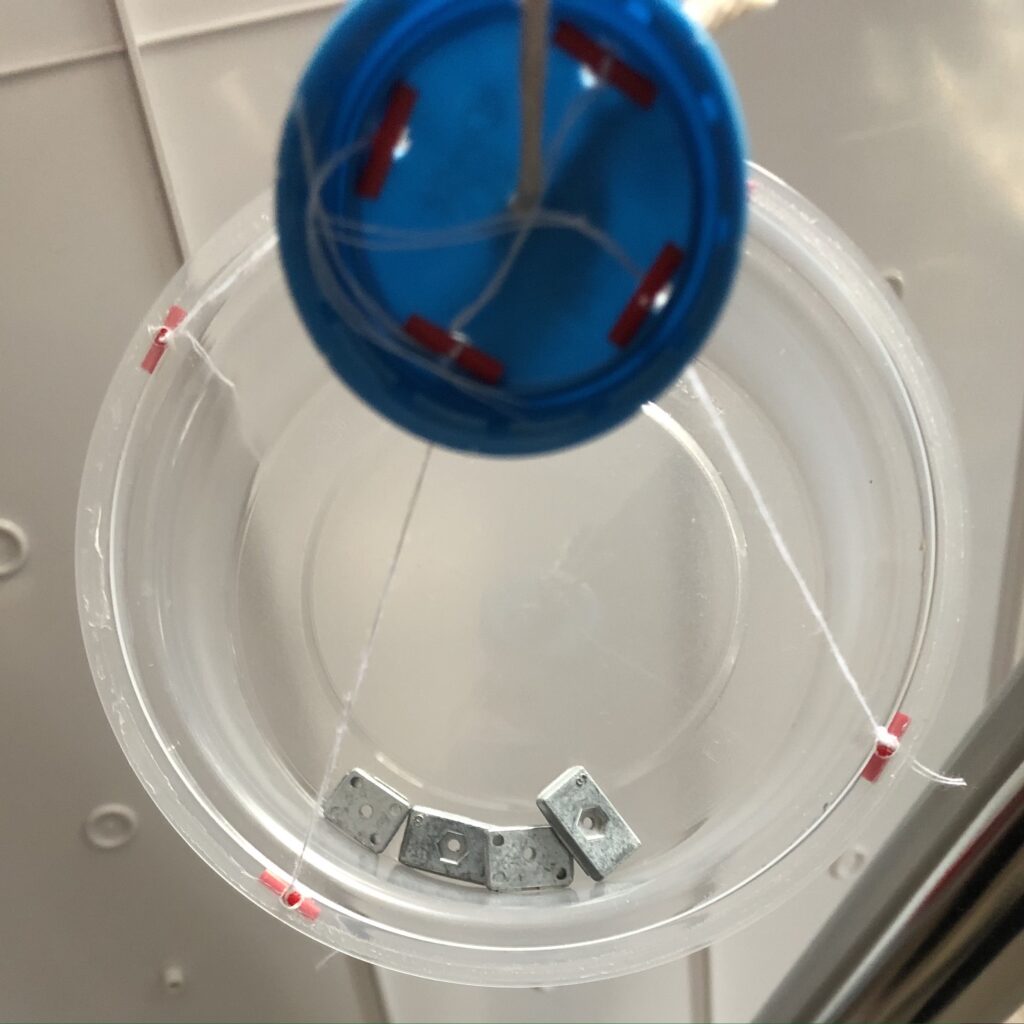
We made a basket (on the left of the diagram) to hold some weights (e.g. Tamiya multi chassis balance weight). The basket is made up of light-weight recycled material and the total mass including part of the rope is around 10.5 grams.
The basket is connected to the car with a rope passing over a custom made pulley.
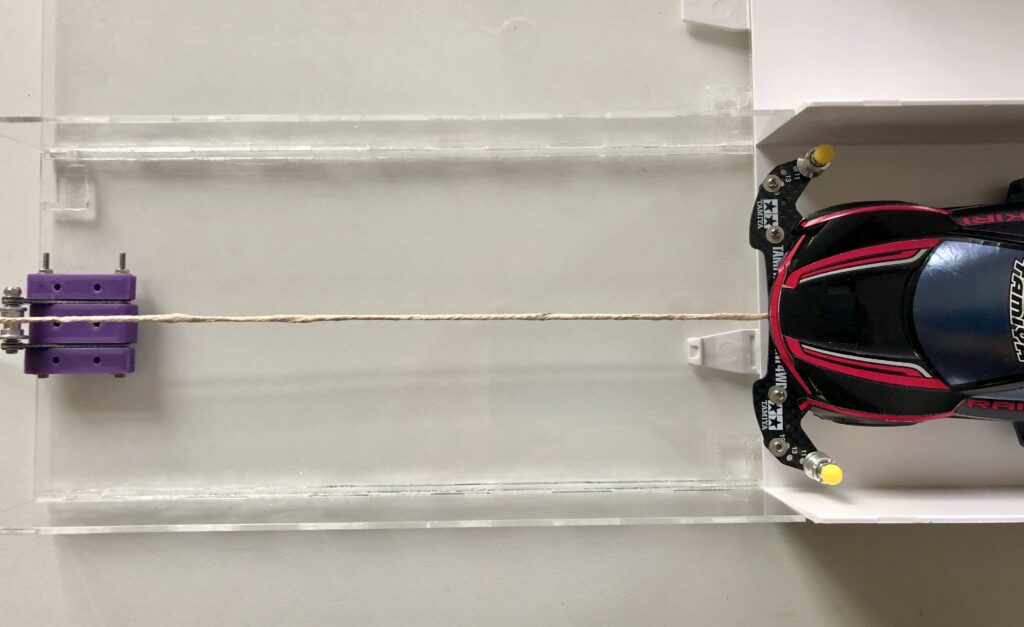
By adding weights in the basket, we can generate pulling force using gravity. We will be adding weights in the basket until the car starts moving in a very slow and steady pace. Then we record the result in a spreadsheet.
The test surface is based on a Tamiya Junior Circuit straight section.
The pulley is made of a Mini 4WD ball-raced double roller to minimise friction and supported by FRP fibre glass strips and 3D printed mounts to give it extra strength. It is mounted on our custom made short straight track section.
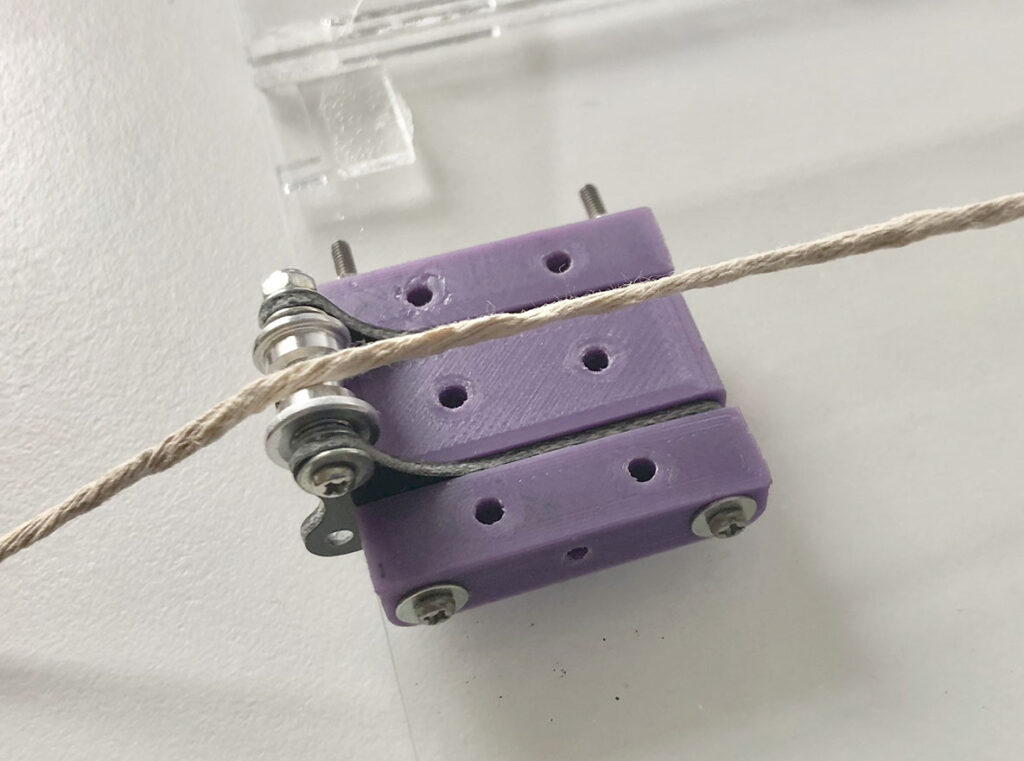
The rope is the strongest and the lightest we can find conveniently in the workshop.
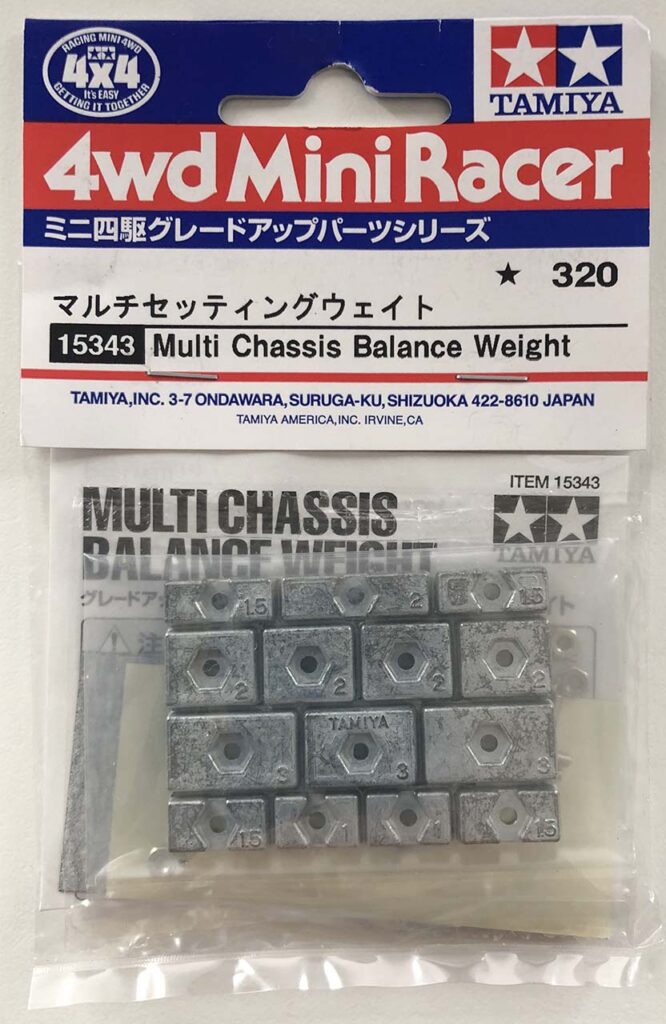
For weights, we will be using Tamiya multi chassis balance weight (Item No: 15343) and some heavy coins and whatever heavy things we can find on the workbench. As illustrated as a grey 20g weight in the diagram.
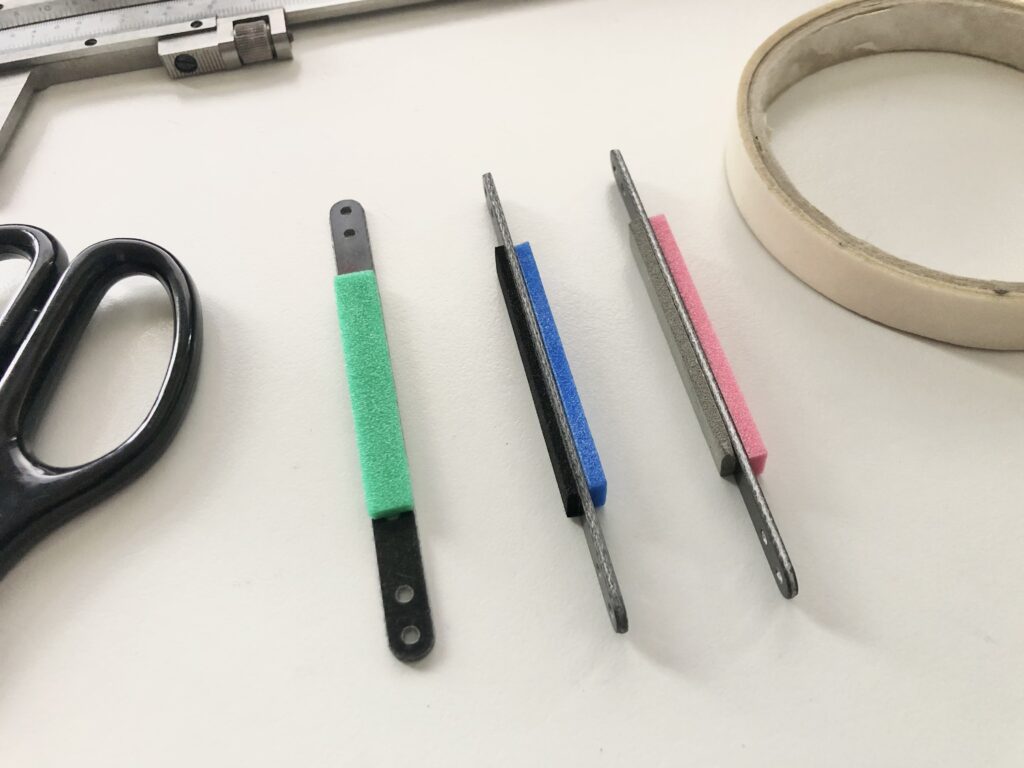
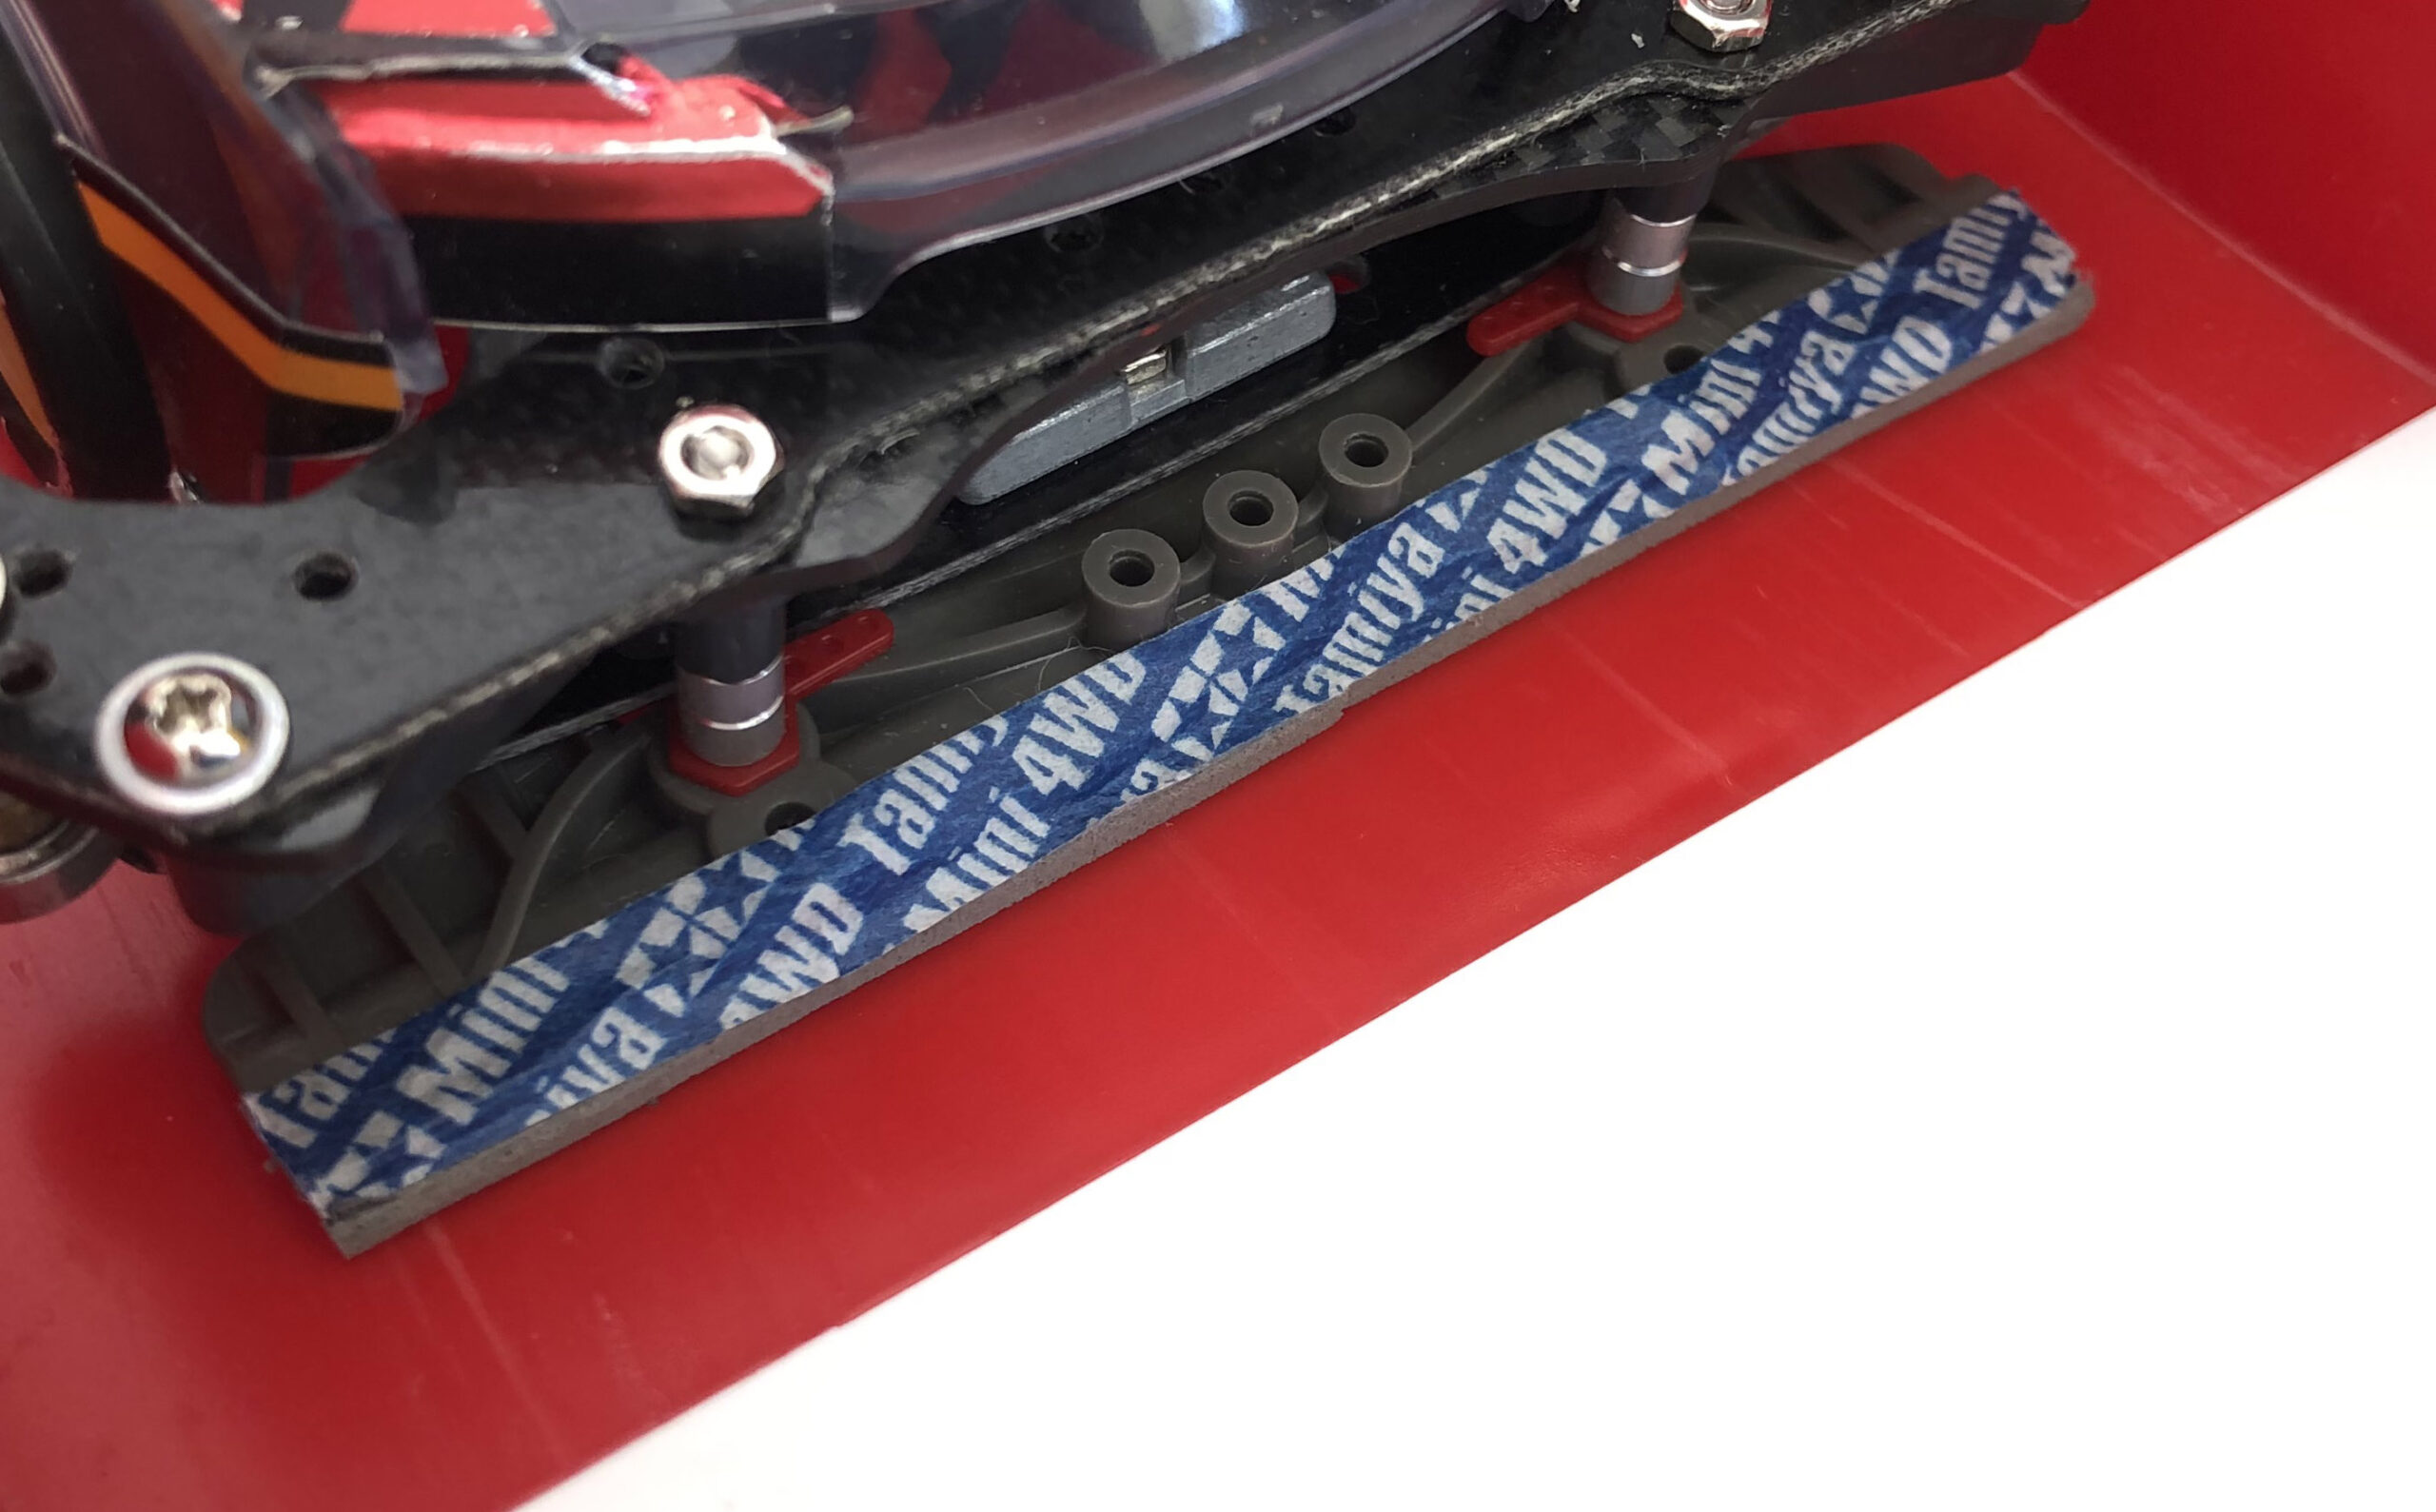
For brake pads, we cut them into strips and stick them on standard fibre glass FRP strips. Then we mount the FRP strips on the rear stay of the car.
The forces
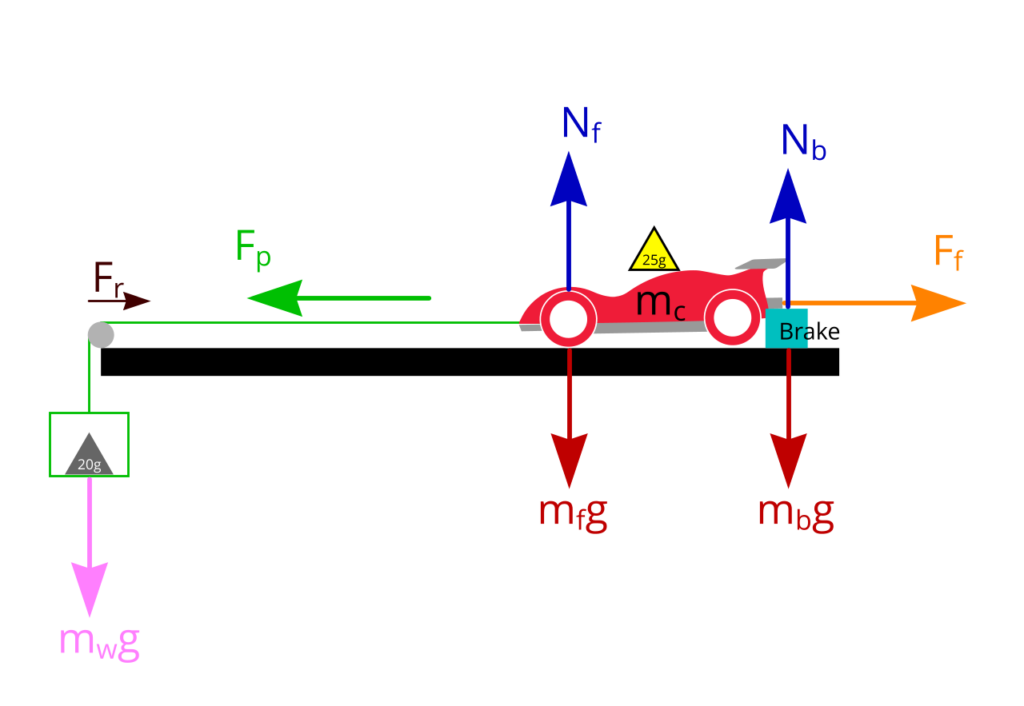
Gravitational acceleration: g = 9.8 m/s2
Normal force on front wheel: Nf = mfg
Normal force on brake pad: Nb = mbg
Mass of the car: mc = mf + mb
Total Normal force on the car: Nf + Nb = mfg + mbg
Pulling force: Fp = mwg
Although the formula for frictional force is: Frictional force (Ff) = friction coefficient (μ) × Normal Force (N)
Since we have a pulley and front wheels in the system, there will be a small amount of friction (rolling frictional force). Let’s call this Fr.
Therefore:
Pulling force (Fp) = friction coefficient of brake pad (μ) × weight acting on the brake pad (mbg) + Rolling frictional force (Fr)
The test
The car we will be using is our Mini 4WD PRO Series no.40 Raikiri (MA Chassis) Item No: 18640. The car weights around 160 grams with batteries, front and rear stays and rollers.
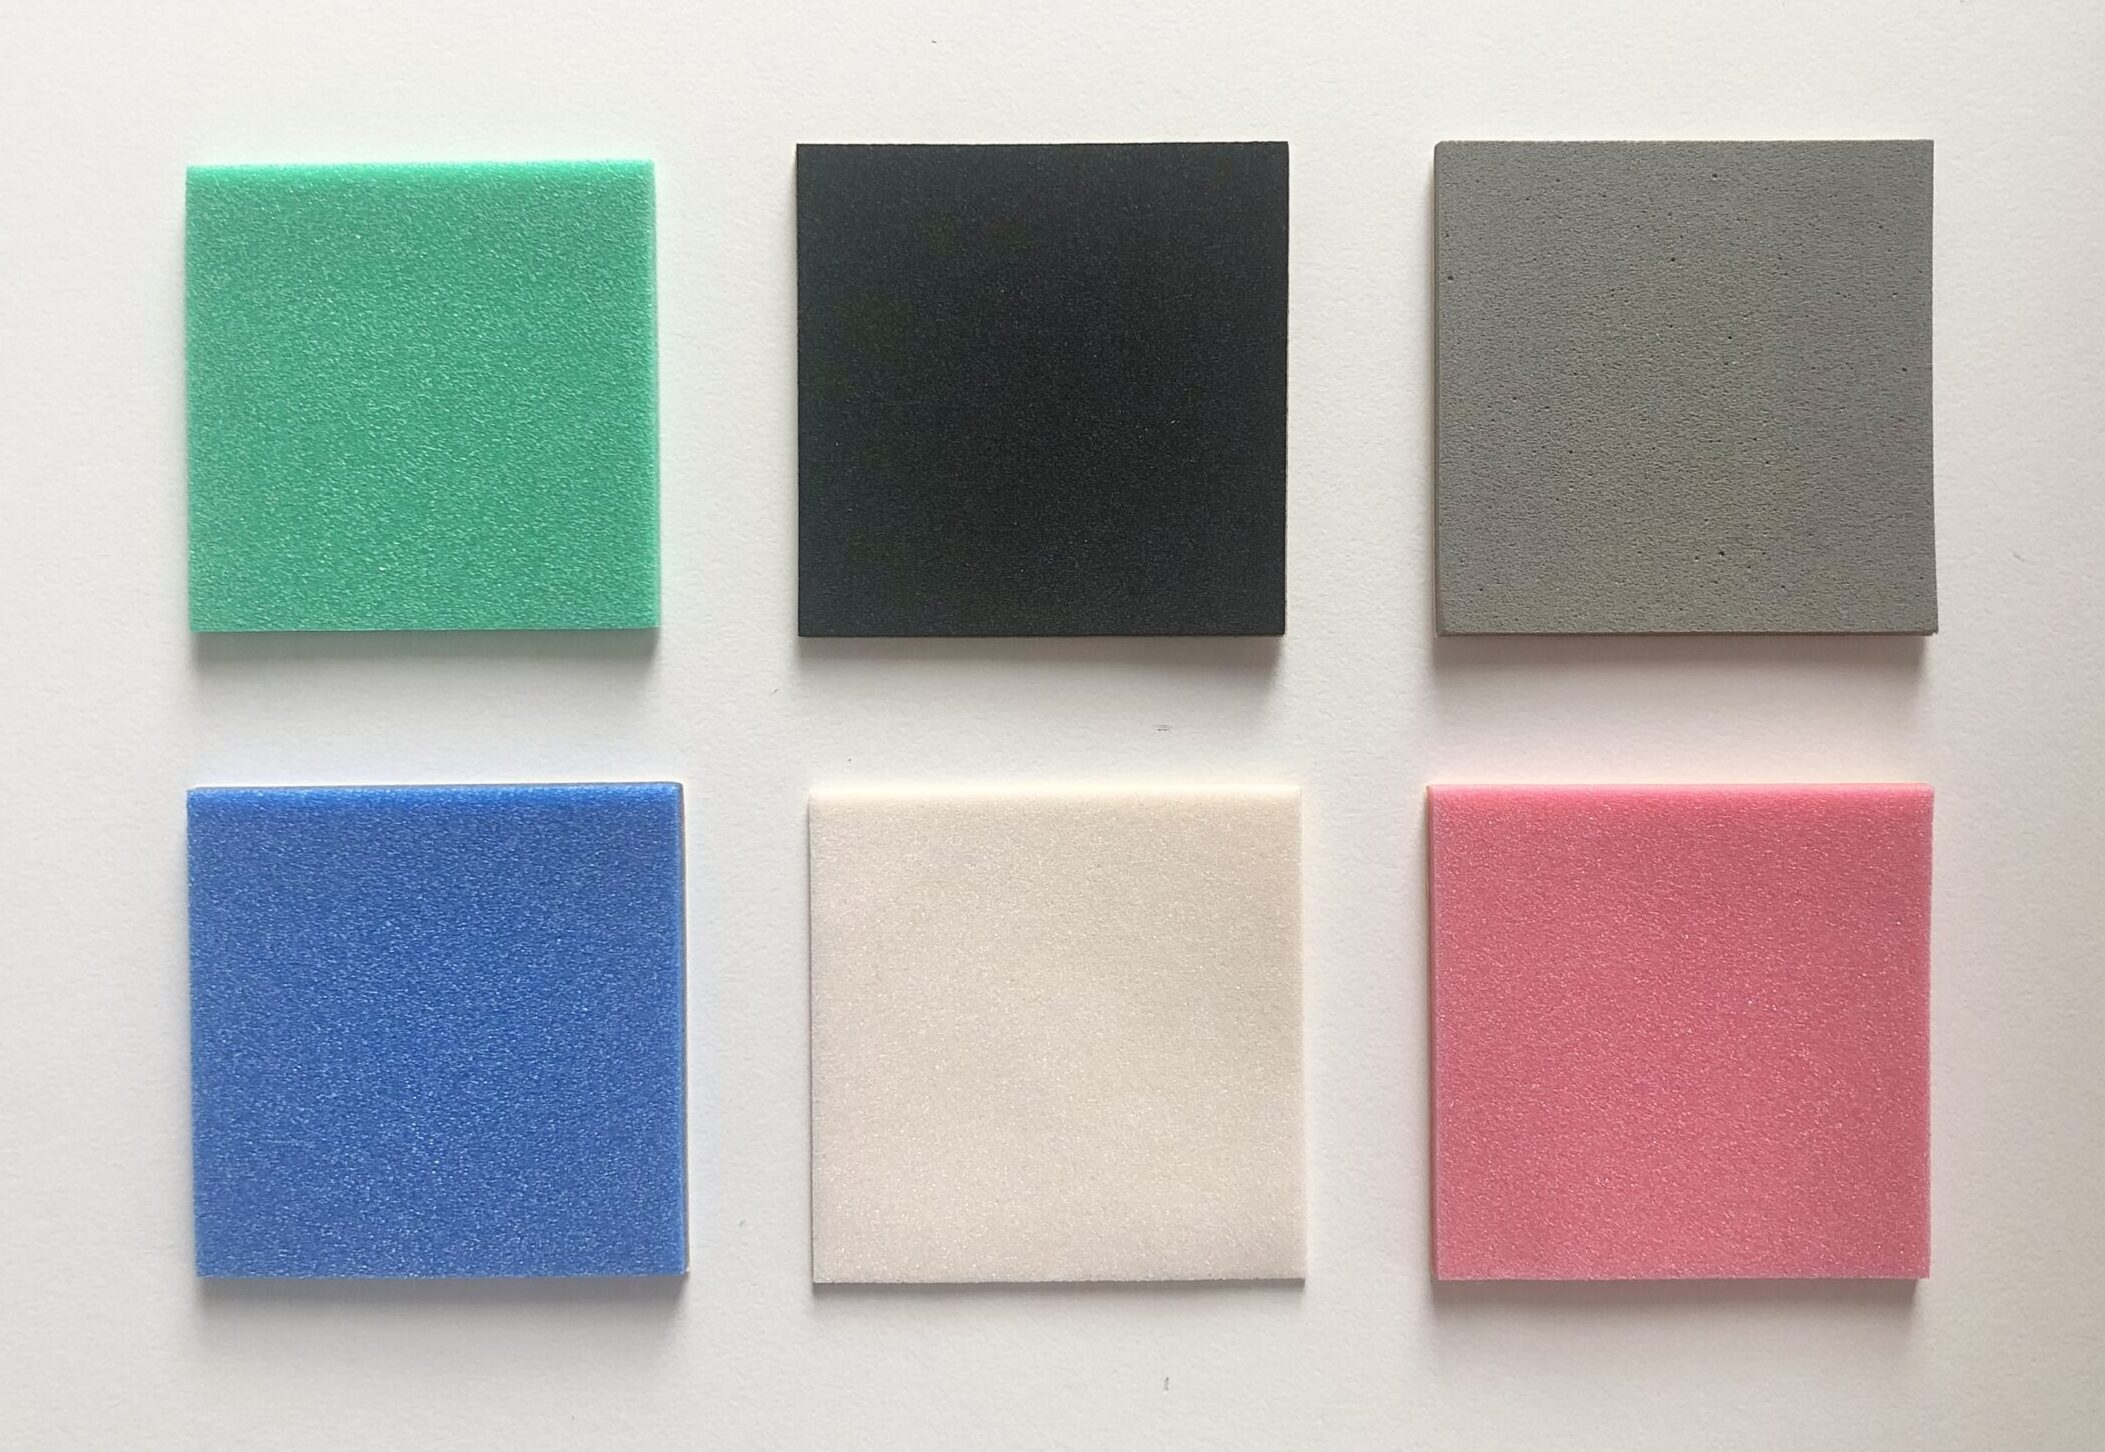
We will be testing seven different brakes:
- MA chassis stock rear brake (blue)
- MA chassis stock rear brake (black) with Tamiya black tape (from item: Mini 4WD Multipurpose Tape (20mm Width/Black) [Item no: 95590])
- Green brake sponge pad (from item: Brake Sponge Set (3 Types) [Item no: 15441])
- Blue brake sponge pad (from item: Tamiya Brake Sponge Set Blue [Item no. 15512])
- Red brake sponge pad (from item: Tamiya Brake Sponge Set Red [Item no. 95566])
- White brake sponge pad (from item: Tamiya Brake Sponge Set (1/2/3mm White) [Item no. 15492])
- Black brake sponge pad (from item: Brake Sponge Set (3 Types) [Item no: 15441])
- Grey brake sponge pad (from item: Brake Sponge Set (3 Types) [Item no: 15441])
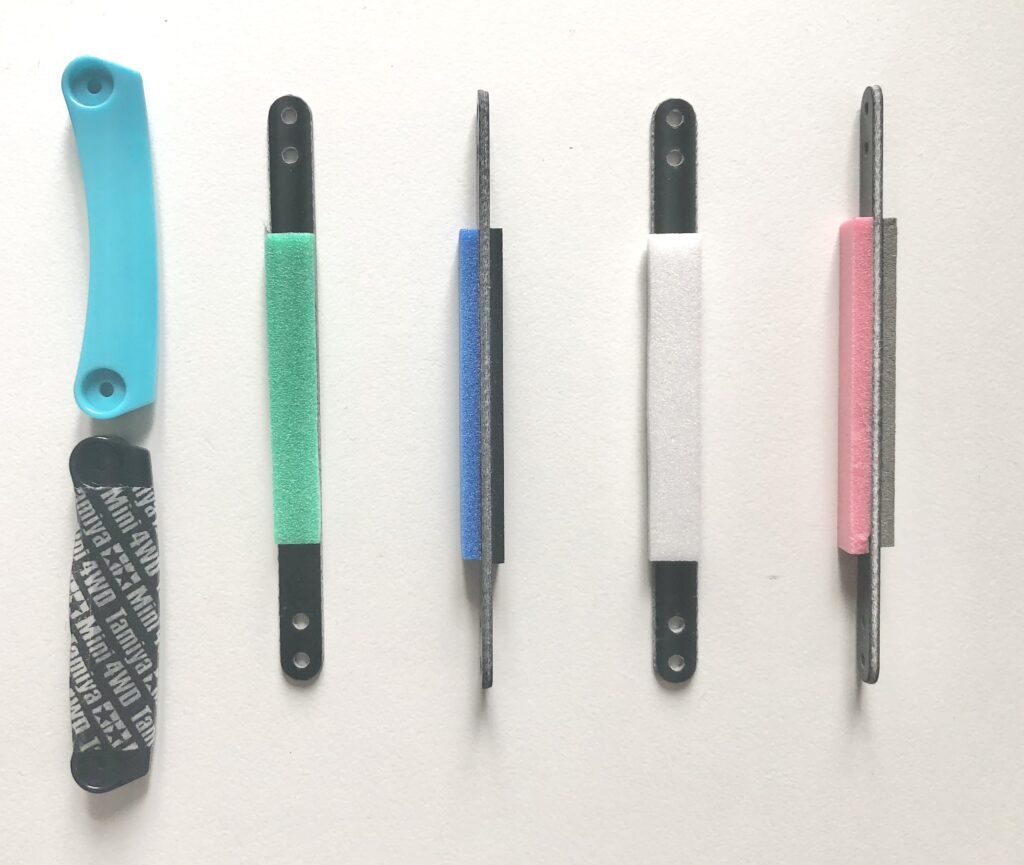
The dimension of each cut brake pads are:
Green: L: 47.4mm, W: 7.2mm, T: 2.8mm
Blue: L: 49.5mm, W: 7.2mm, T: 2.8mm
White: L: 49.5mm, W: 7.2mm, T: 2.8mm
Red: L: 49.6mm, W: 7.2mm, T: 2.8mm
Black: L: 50mm, W: 7.2mm, T: 1.6mm
Grey: L 49mm, W: 7.2mm, T: 1.9mm
(Length, Width, Thickness)
We will be testing each brake pad five times. Starting with the car’s own weight, then add one AA battery (~25g), two AA, three AA and finally with the 100g test weight. As illustrated as a yellow 25g weight in the diagram. There will be 4 increments, hence five test results for each brake pad.
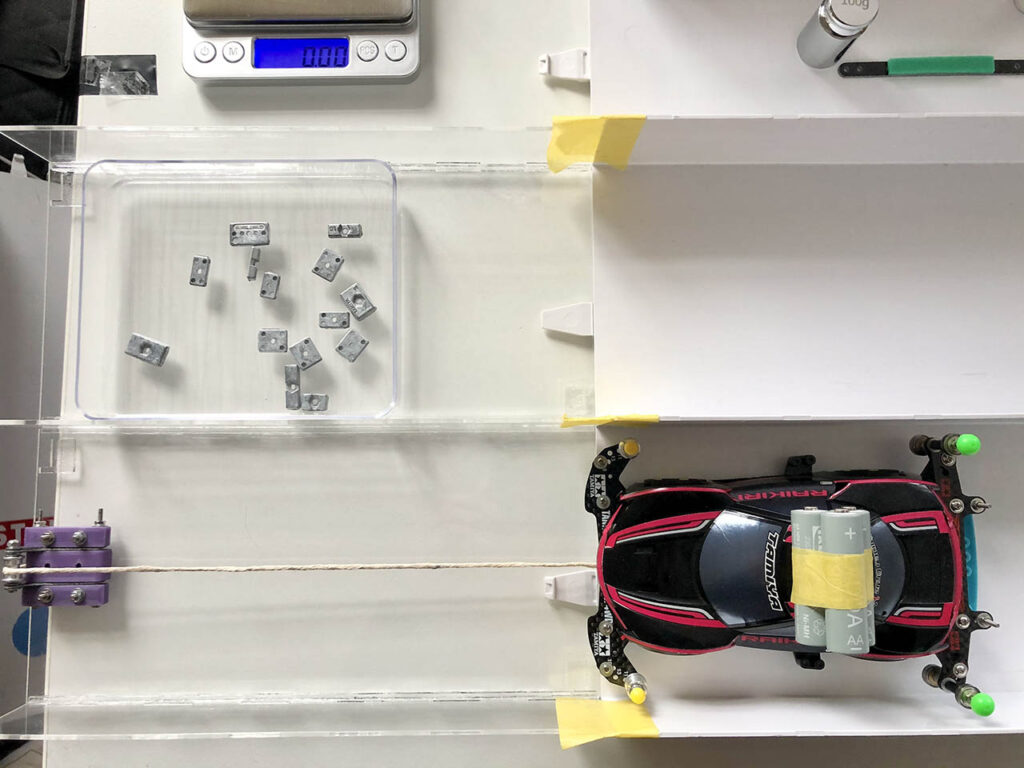
To get an accurate picture of the force acting on the brake pad we will use our precision electronic scale to measure the weight acting on the brake pad.
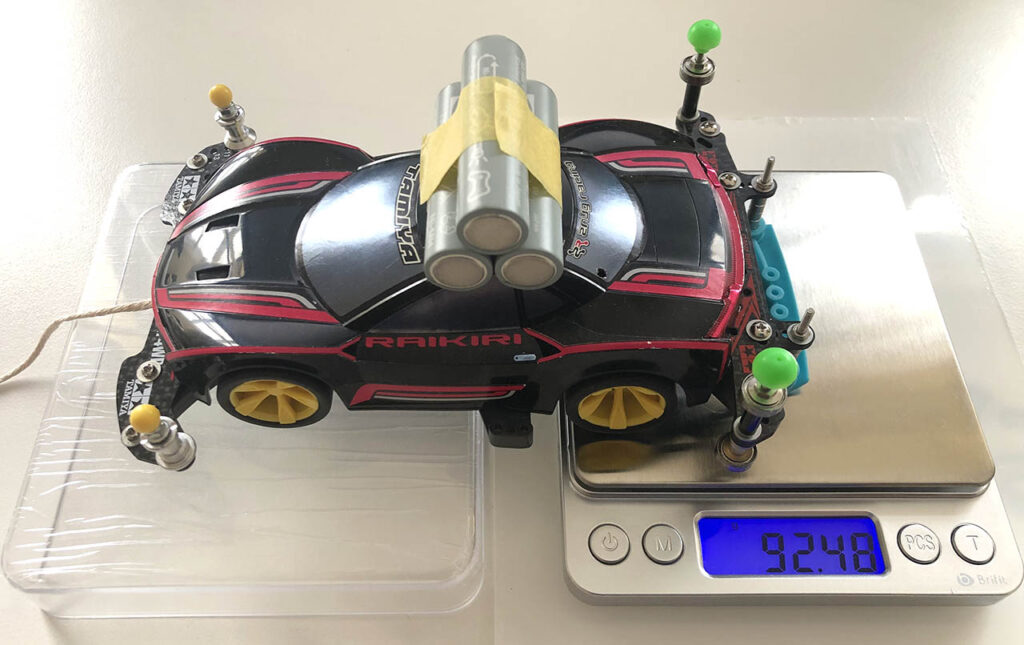
We find the Pulling force (Fp) required to move the car by adding weights in the basket. We continue adding weights until the car starts moving in a very slow and steady pace.
Then put the weights into our precision electronic scale to measure the total weight. The results (two values) are recorded in a spreadsheet.
We can calculate the pulling force by adding the weight and the basket and then multiply the sum with gravitational acceleration 9.8m/s2.
We can calculate the Normal Force by multiplying the weight acting on the pad with gravitational acceleration.
All in all, there will be 35 sets of readings.
Checks
We checked that the test track is level. We make sure the rope (line) is as level as it can and as straight as it can to minimise errors.
We tested friction on the wheels and pulley by checking whether just the weight of the basket is enough to pull the car forward. It was able to do it without much resistance. Fr will be tiny.
We made sure the scale was calibrated before use. We also made sure the scale was reading zero at the start of every measurement.
We made sure the test surfaces (track and pads) are clean.
Assumptions
As mentioned in the checks section, we noticed that the rolling resistance of the pulley system and the front wheel is very small. To keep things simple we will assume that Fr is zero.
Pulling force (Fp) = friction coefficient of brake pad (μ) × weight acting on the brake pad (mbg) + Rolling frictional force (Fr)
Becomes:
Pulling force (Fp) = friction coefficient of brake pad (μ) × weight acting on the brake pad (mbg)
We will use 9.8m/s2 for gravitational acceleration.
Test results
Based on the measurements we captured in a spreadsheet, we calculated the Normal Force and the Pulling force and plotted the result below. We know the formula to calculate coefficient of friction (as above). We can use linear regression to help us find the best fit line, smooth out some errors and calculate coefficient of friction.
Since we assume the rolling resistance (Fr) on pulley is zero, we can set the y intercept of the linear regression line to zero.
The gradient of the regression line is the friction coefficient.
MA chassis stock rear brake
Chart showing the normal force and pulling force on a Tamiya Mini 4WD MA chassis stock plastic brake pad.
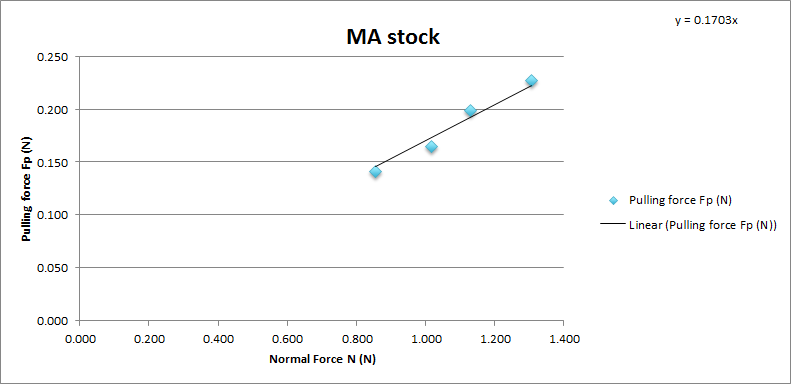
As the MA stock brake is very smooth and has little friction, the car was moving forward with the weight of the basket alone. It was quite hard to measure but we managed to put some weights on the car’s rear mount and got some results. The coefficient of friction of MA stock is 0.1703. With average 0.17 and standard deviation 0.007.
Tamiya black tape on MA chassis rear brake pad
Chart showing the normal force and pulling force on MA stock brake pad with Tamiya black tape.
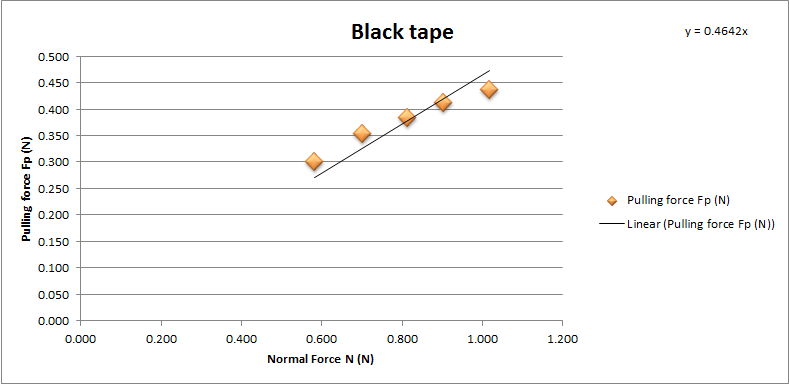
The coefficient of friction of MA stock brake with Tamiya black tape is 0.4602. With average 0.48 and standard deviation 0.035.
Green sponge brake pad
Chart showing the normal force and pulling force on Tamiya green sponge brake pad.
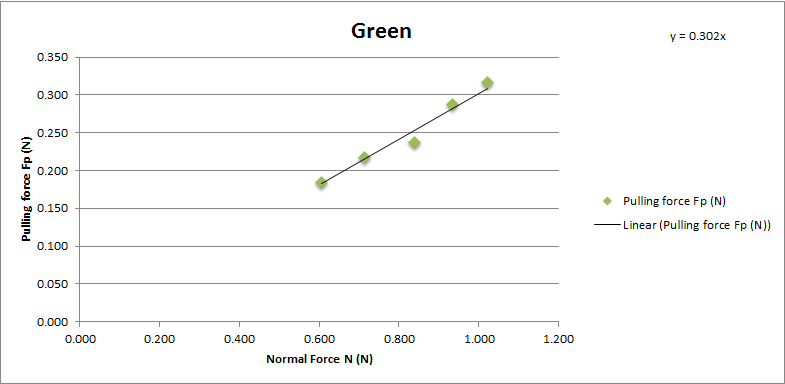
The coefficient of friction of Tamiya green brake pad is 0.302. With average 0.3 and standard deviation 0.011.
Blue sponge brake pad
Chart showing the normal force and pulling force on Tamiya blue sponge brake pad.
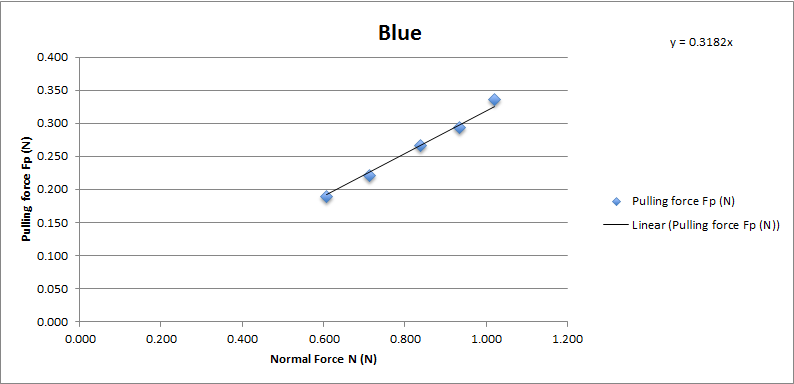
The coefficient of friction of Tamiya blue brake pad is 0.3182. With average 0.32 and standard deviation 0.007.
White sponge brake pad
Chart showing the normal force and pulling force on Tamiya white sponge brake pad.
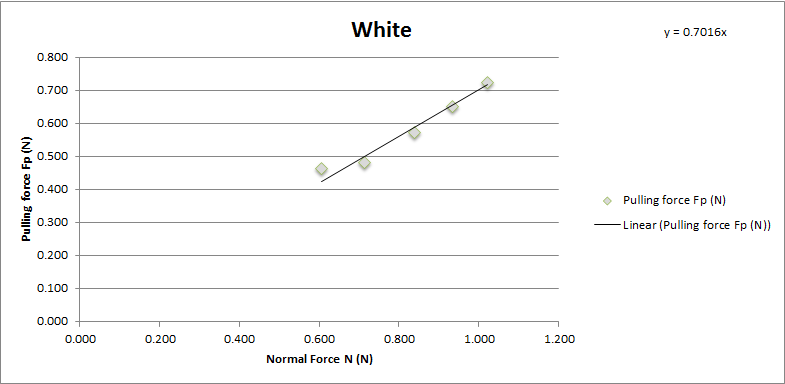
The coefficient of friction of Tamiya grey brake pad is 0.7016. With average 0.71 and standard deviation 0.036.
Red sponge brake pad
Chart showing the normal force and pulling force on Tamiya red sponge brake pad.
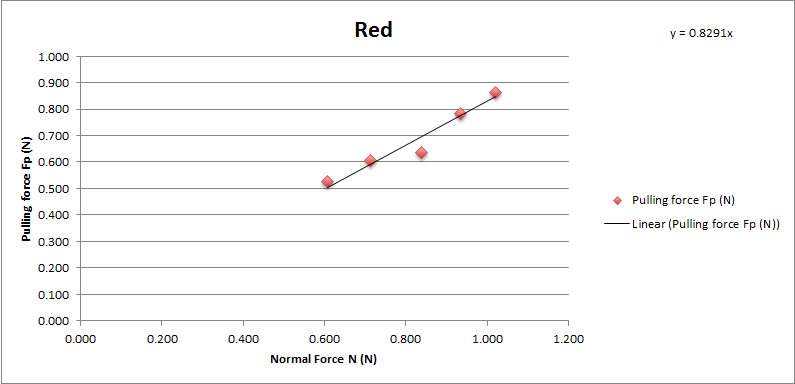
The coefficient of friction of Tamiya red brake pad is 0.8291. With average 0.83 and standard deviation 0.042.
Black sponge brake pad
Chart showing the normal force and pulling force on Tamiya black sponge brake pad.
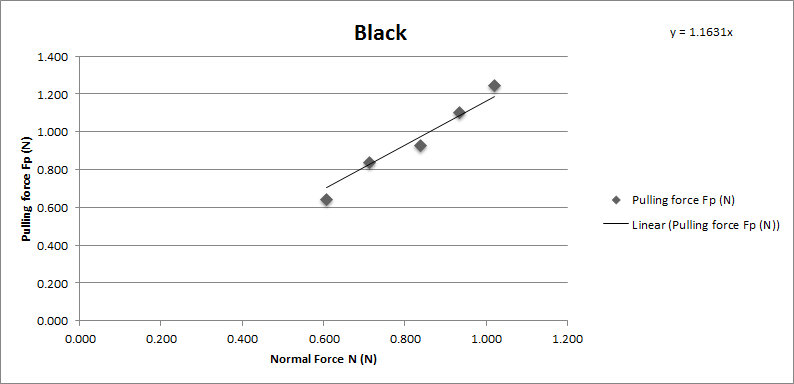
The coefficient of friction of Tamiya black brake pad is 1.1631. With average 1.15 and standard deviation 0.063.
Grey sponge brake pad
Chart showing the normal force and pulling force on Tamiya grey sponge brake pad.
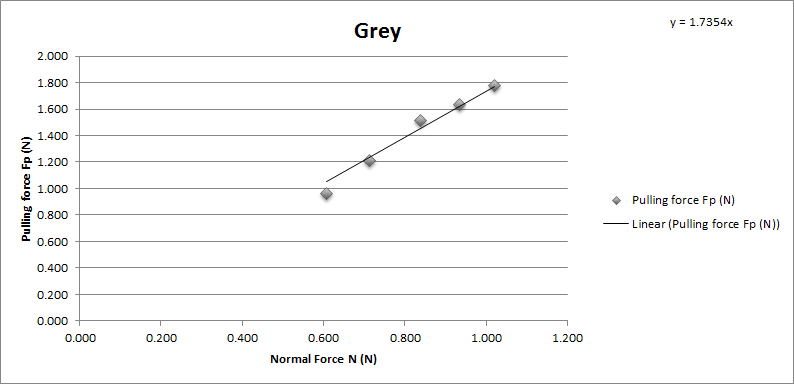
The coefficient of friction of Tamiya grey brake pad is 1.7354. With average 1.72 and standard deviation 0.084.
Frictional coefficient per square millimetre for each sponge brake pads
We calculated the frictional coefficient per square millimetre for each sponge brake pads, here is what we’ve got:
- Green: 0.000884904
- Blue: 0.000892817
- White: 0.001968575
- Red: 0.002321629
- Black: 0.003230833
- Grey: 0.004918934
These can be used to estimate the frictional coefficient for the size of the brake pad you have. Just calculate the brake pad surface area in millimetre square and multiply it with the coefficient according to your brake pad type above.
Errors
We noticed we get a slightly different weight result (±2g) if we put the weights slightly forward or backword on top of the car just by a few millimetres. We tried to put it back to the same location as much as possible.
When deciding whether the car is moving at a very slow and steady pace, it is based on subjective judgement, so there is a chance for error. We tried to mitigate this issue by varying the weight in smaller increments when reaching the tippling point and we sometimes repeated the experiment with smaller total to double check.
We noticed the Tamiya chassis weights are not exact (i.e. 2 grams weight is not exactly 2 grams); hence we used the precision electronic scale instead of adding the numbers up from the markings.
Ranking the brake pads
Let’s put the results together and compare all the brake pads from slippery to grippy.
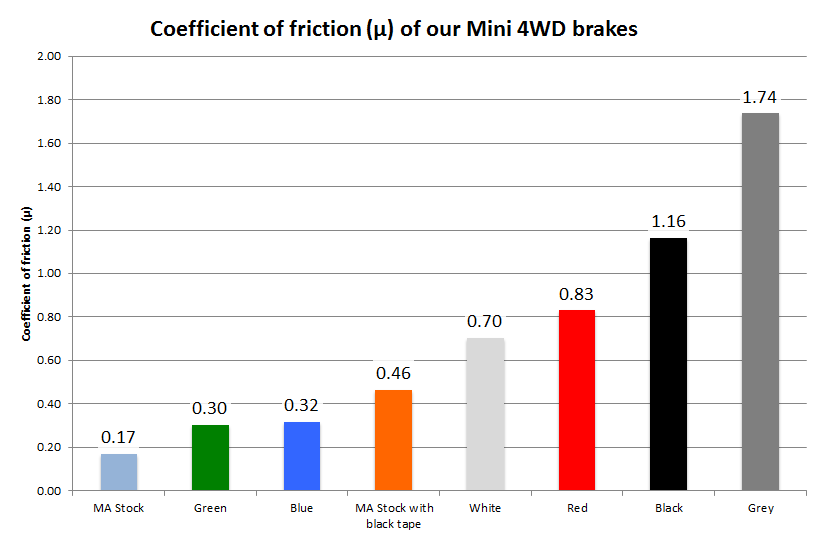
From the experiment we conducted. The most slippery brake pad is the MA chassis stock rear brake ( μ = 0.17 ) whereas the Tamiya grey sponge brake pad is the most grippy ( μ = 1.74 ), then follow by black ( μ = 1.16 ), red ( μ = 0.83 ), white ( μ = 0.7 ), MA Stock with black tape ( μ = 0.46 ), blue ( μ = 0.32 ) and green ( μ = 0.30 ).
Green and Blue sponge brake pad are quite similar in strength ( 0.30, 0.32 ). The Tamiya black tape fits in between Tamiya blue and red.
Compare to MA chassis stock rear brake
Let’s compare them based on the magnitude of frictional strength.
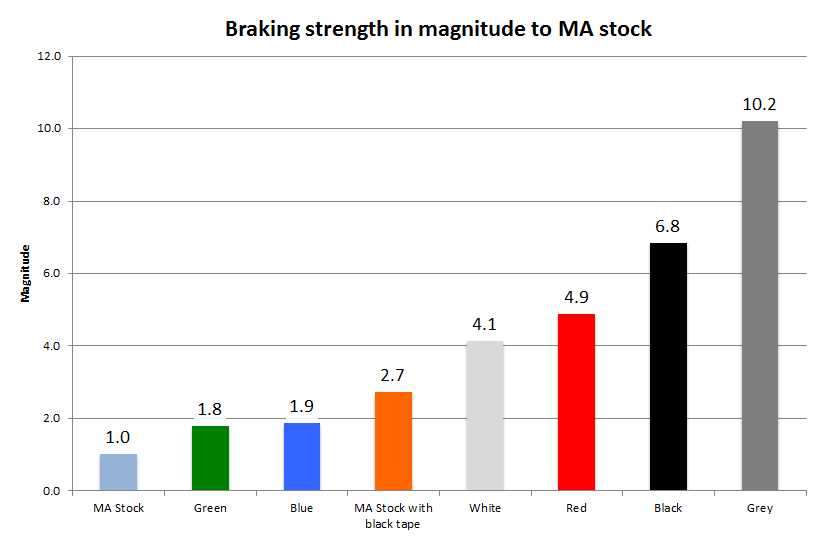
The Tamiya grey sponge brake pad is 10 times more grippy than MA stock. Whereas red sponge brake pad is a half way between the two. If you add a blue sponge pad on an MA chassis stock rear brake, it will almost double the braking power. If you add the black tape on the MA stock brake, it will increase the braking power by 2.7 times!
Some say the white sponge brake pad is a replacement of the red sponge brake pad. From our experiment, we can see that the braking strength is quite close, but not close enough to call a replacement.
We noticed that the all the brake sponge pads have very similar grip characteristics i.e. when we give it enough pulling force to get the car moving, the car will continue moving at a very steady pace. It means the static frictional coefficient is very near to (or even equal to) the kinetic frictional coefficient. (μs = μk)
On the other hand, both the MA stock and MA stock with tape will start flying off once the pulling force overcome the static frictional force. It means the static frictional coefficient is bigger than kinetic frictional coefficient. (μs > μk)
Compare to blue sponge
If we take the blue sponge brake pad as a base, we can visualise how much stronger or weaker the other colour sponge brake pads are in comparison.
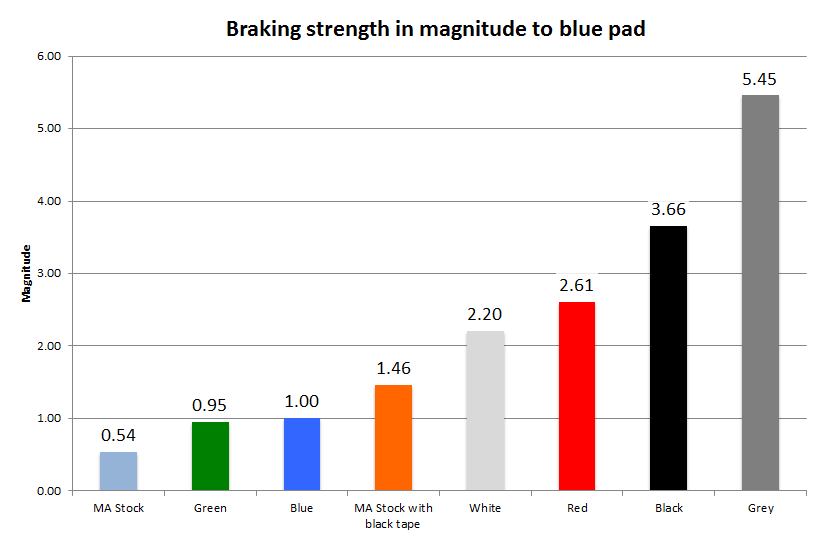
If blue sponge brake pad has a strength of 1.0, then the white sponge is 2.2 times more grippy than blue and grey sponge is 5.45 times more grippy than blue.
Double checking Rolling resistance (Fr)
We experimented with not setting the y-intercept to zero and see what values we got from regression. Although we don’t have enough data points to confidently work out the value of rolling resistance, we could use the result to help us double check to see whether we had missed something important. The y-intercept values based on the 4-5 data points per brake pad test were -0.0304, 0.1282, -0.0126, -0.0228, 0.026, -0.1936 and -0.2074. Average -0.0447. A relatively small number that could be generated by human error when judging “moving very slowly and steadily”. Certainly we can look into this further in future experiments with 20+ data points.
What does the result mean to fellow racers?
If you want the maximum stopping power, go with the grey sponge pad. If you want the least, use MA Stock or equivalent. If you want to use tapes, the Tamiya black tape provides more stopping power than blue sponge pad but not as much as red pad.
The sponge brake pads will give you a more consistent braking result whereas the MA stock and MA stock with tape will give you a bigger braking power at the initial contact and then it will reduce a lot more as it glides on the track surface. Perhaps that’s why people tend to use plastic brake pads or taped brake pads on the front to give a more abrupt braking power and use sponge brake pads at the back to get a more consistent braking result.
Certainly there are areas that we haven’t explored just yet, just to name a few:
- How the size, shape and thickness of the brake pad affect braking power?
- How dwell time (how much time the pad makes contact with the track surface) affects the deceleration of the car?
- How different track surface (plastic, wood) and condition such as including clean, dusty and scratched surface affect braking power?
- How much does the weight of the car affect braking and deceleration?
- Can we use the sponge pads in combination?
- Position of the pad
- New pad vs old pad
- Temperature: would repeat use make it warm? Would warmer pad temperature affect the braking capability?
We can look into these in future experiments.
Can we estimate how much speed the car will slow down with the Tamiya Grey sponge brake pad?
Yes it is possible to estimate the speed reduction with the brake pad. This example is by no means absolute, but I hope it provides you some interesting information.
Assumptions:
- Gravitational acceleration is 9.8 m/s2
- The weight acting on the front bumper and the brake pad are spread equally.
- Front bumper, wheel or brake pad does nothing to slow the car down.
- Wheels are lifted from the surface during braking, so no acceleration from the motor.
Excluded in the calculation:
- Car slows down going up the slope (Gravity)
- The centrifugal effect when the car is pitching up the slope, usually this will increase the Normal force acting on the brake pad.
Parameters:
- Car mass: 160 grams (0.16kg)
- Grey sponge brake pad frictional coefficient per square millimetre (from our experiment) : 0.004918934
- Brake pad dimensions and size: 90mm by 1mm = 900mm2
- Length of travel when the brake pad touches the surface is 4cm (assumption).
Calculations:
Weight on brake pad: 0.16 ÷ 2 × 9.8 = 0.784 (half the weight as mentioned in assumption)
So normal force on the brake pad is 0.784 Newtons
Frictional coefficient for our 90 × 10 grey sponge pad is 900 × 0.004918934 = ~4.43
So frictional force is 4.43 × 0.784 = 3.4708 Newtons
Work done (energy) = Force × Distance, so the energy required to move 4 cm is 3.4708 × 0.04 = 0.138832 joules of energy. We will use this as braking energy.
Assuming the car is travelling at 7 m/s when reaching the slope.
So the energy it carries is: Kinetic Energy = ½ × mass × velocity2 = 0.5 × 0.16 × 72 = 3.92 joules
Energy left after it has been taken away by the braking energy is 3.92 – 0.139 = 3.78 joules
Convert it back to speed using the Kinetic Energy formula and we get 6.87 m/s
So if we want the car to slow down from 7 m/s (Hyper Dash PRO top speed range) to around 4 m/s which is the speed where the car is likely to land at the end of the downward slope section (according to our previous experiments). The brake pad size will need to be around 160mm × 105mm, which is almost the size of the Mini 4WD!
Conclusion
Tamiya grey sponge pad has the strongest braking power amongst all.
This experiment is by no means conclusive. Your experiment might produce slightly different results. However the investigation does give an insight to the braking capability of different brake pads and how they rank amongst each other. We hope that it provides you a useful insight to the subject matter.
What would you take away from this experiment? How would you improve it? Please feel free to leave a comment on our Facebook page @Mini4Science.
Annex
Items and parts that we used
Tamiya Junior Circuit (one straight section only)
Tamiya Brake Sponge Set Blue (Item no. 15512)
Brake Sponge Set (3 Types) (Item no: 15441)
Tamiya Brake Sponge Set Red (Item no. 95566)
Mini 4WD Multipurpose Tape (20mm Width/Black) (Item no: 95599)
Double Aluminum Rollers (9-8mm) (Item no: 15403)

![7 different Tamiya Mini 4WD low profile small diameter tyres [Item no: 95208, 95205,95152, 95281, 95304]](https://mini4science.com/wp-content/uploads/2024/09/IMG_0538_mod2-150x150.jpg)
![8 different Tamiya Mini 4WD metal rollers [Item no: 95612, 15522, 95643, 95497, 15426, 95160, 15345, 15475]](https://mini4science.com/wp-content/uploads/2024/07/IMG_0296-150x150.jpg)


![7 different Tamiya Mini 4WD low profile small diameter tyres [Item no: 95208, 95205,95152, 95281, 95304]](https://mini4science.com/wp-content/uploads/2024/09/IMG_0538_mod2.jpg)
![8 different Tamiya Mini 4WD metal rollers [Item no: 95612, 15522, 95643, 95497, 15426, 95160, 15345, 15475]](https://mini4science.com/wp-content/uploads/2024/07/IMG_0296-scaled.jpg)


